What is In-Process Monitoring?

In-process monitoring is the on-machine, real-time assessment of part and process quality based on the direct observation of the process physics and dynamics. It is based on the premise that most in-process physical behaviors of a manufacturing process can and should be regarded as process quality feedback. In-process monitoring provides real-time, non-destructive manufacturing process quality feedback that enhances, complements, and extends the engineering efforts that have already gone into the process. This article provides a brief introduction to in-process monitoring, including why it is important, how it works, and the benefits associated with its implementation.
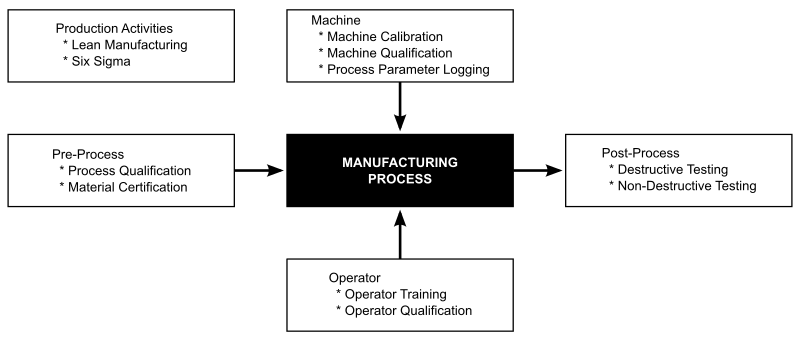
The various components of a typical quality-assured and quality-controlled process are illustrated in the figure below. Current quality assurance and quality control (QA/QC) best practices typically involve a thorough process qualification effort, machine calibration and qualification, operator training and qualification, material certification, and the application of extensive post-process destructive and non-destructive test methods. Throughout this entire process, sophisticated production practices such as Lean Manufacturing and Six Sigma are continuously applied to improve efficiency, eliminate waste, optimize flow, and reduce variability. From a QA/QC perspective and in most manufacturing environments, the manufacturing process is treated as a black box, where the inputs are tightly controlled and the resulting product is thoroughly tested but the in-process behavior is largely overlooked.

In general, the majority of a manufacturer's time and resources are spent tightening tolerances, ensuring compliance, and/or increasing post-process destructive and non-destructive testing. While such efforts are important to a quality-assured and quality-controlled process, there are diminishing returns for higher standards through increased destructive and non-destructive testing.
References in the open literature to in-process monitoring date back over fifty years [1-3]. The concept is not new, but the transition from research and development to commercialization has been slow up until recently. In-process monitoring is a quality control technique based on real-time, on-machine measurements of a given manufacturing process. In-process monitoring measures process deviations from expected behavior. As such, it can see very subtle variations from part to part over the lifetime of the manufacturing process. In-process monitoring can be applied to both existing processes and new processes.
At its very basic level, in-process monitoring tracks a machine’s capabilities. A machine capability measurement indicates whether or not the machine tool delivered the desired machine setpoint parameter. For example, for rotary friction welding, a machine's capabilities might answer the following question: Did the machine tool deliver the required speed or pressure, or did it reach the desired level of burn-off, and if so to what tolerance? Although most modern machine tool controllers incorporate some level of machine fault diagnostics, this capability constitutes the platform upon which the fundamentals of in-process monitoring stem.
However, in-process monitoring is more than machine monitoring, and maintaining this fundamental perspective helps introduce the groundwork for in-process monitoring's more powerful capabilities:
- Dynamic Machine and Process Variations: Even if the machine tool did deliver the required speed and pressure, were there aspects of the time-varying signals that indicate process variations and faults? This is referred to as “dynamic process capability”, and it can determine if there were subtle changes in the process behavior occurring at different points in time during the manufacturing process.
- Anomaly Detection and Classification: Was there something totally unexpected that occurred over any time scale and in any sensor channel that could be indicative of an intermittent or sporadic anomaly? Contamination is a perfect example of such an event. This is the hardest process fault to detect, yet this is where in-process monitoring goes beyond machine monitoring and post-process inspection to have the ability to detect these process anomalies.
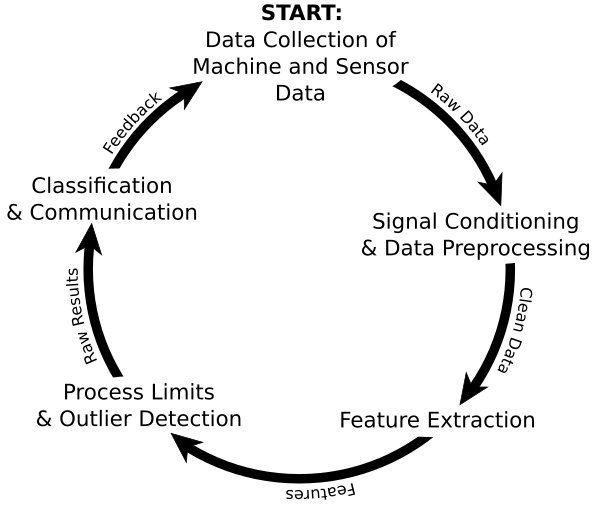
This more robust approach requires additional steps beyond simply testing machine and process actuals lie within certain prescribed thresholds. An on-machine, real-time assessment of part and process quality requires a rather sophisticated journey from raw, ill-defined data to concise, actionable quality inference. The following figure illustrates the cycle of events that must take place in order to successfully execute an in-process monitoring solution.

Each step in the cycle is explained below:
- Data Collection of Machine and Sensor Data: First the ill-defined raw data are conditioned, sampled, and aligned with respect to the “process start” and “process stop”.
- Signal Conditioning and Data Preprocessing: Then, the data is “cleaned” through digital filtering, spectral transforms, and other signal processing transforms.
- Feature Extraction: The raw data alone are ill-defined, dense, and nearly impossible to interpret. As a result, feature extraction is employed to reduce the data density while preserving, enhancing, and ultimately capturing the key process physics that allows discrimination between nominal and off-nominal events.
- Process Limits and Outlier Detection: Once the features have been calculated, it is now necessary to delineate which features are within expected values for a nominal process, and which are not. This is based on a clear understanding of baseline process performance, i.e., what the end user considers nominal.
- Classification and Communication: Based on the analysis of limits, it is possible to condense the many features into just a single actionable end result, that is, either the process is behaving in a nominal manner, or it is not. This classification can then be used to communicate to the operator as to whether the part should receive further downstream process (i.e., nominal) or be set aside for further inspection (i.e., off-nominal).
In-process monitoring is the ability to continuously assess the health of a manufacturing process, and it represents a paradigm shift from the traditional way of manufacturing products in which post-process, or tailgate, inspection is applied to assess the product’s quality and the process’s health. In-process monitoring shifts the quality control reference from an outside view, where the operations are items on a work instruction and the measurements are taken post-process from tangible product attributes to an inside view where the physical processes are interrogated as they happen. Instead of making a product and then inspecting it, the in-process monitoring methodology integrates inspection into the manufacturing process and, thereby, provides continuous and real-time feedback of the manufacturing process’s health.
In-process monitoring is more than machine monitoring and machine capability measurements. While feedback that the machine delivered the desired setpoint parameters is important, an in-process monitoring solution expands upon this by capturing the process physics that directly impacts the product's quality. Integrating an in-process monitoring solution into your manufacturing process can:
- Provide objective evidence that the process is consistently producing product complying with the predetermined design and development requirements.
- Enhance, complement, and extend the current manufacturing quality-assurance and quality-control paradigm by providing an in-process view of quality control.
- Offset or replace an over-reliance on post-process, destructive and non-destructive testing.
- Produce the necessary quality feedback when the predetermined requirements of the product can only be assured by destructive testing or when processing deficiencies may only become apparent after a component is further processed or the finished product is in use.
Please contact us to learn how we can help migrate your traditional quality assurance approach to an in-process approach.
--
[1] W.D. Jolly. "An In Situ Weld Defect Detector Acoustic Emission." BNWL-817, Battelle Memorial Institute, Pacific Northwest Laboratory, January 1968.
[2] C.R.G. Ellis. "Continuous Drive Friction Welding of Mild Steel." The Welding Journal, vol. 51, pp. 183s-197s, April 1972.
[3] W.A. Baeslack. "Acoustic Emission Monitoring of the Arc Stud Welding Process as a Method of Determining Weldment Quality." M.S. Thesis, The Ohio State University, 1974.
